Nested vSphere Lab with VSAN
In order to study for the VMware VCIX-NV exam I started with setting up a (nested) VMware ESXi cluster with the VSAN feature enabled.
Initial vSphere Lab Setup
Physical Lab Setup
NL-RTD01-VCENTER01 web administration page
NL-RTD01-VCENTER01 vSphere Web Client
For troubleshooting purpose I enabled SSH on my physical ESX server (NL-RTD01-ESX02) using these instructions.
The physical ESX server is connected to the access switch NL-RTD01-AS02.
The interface configuration to enable trunking (between NL-RTD01-ESX02 and NL-RTD01-AS02):
!
interface GigabitEthernet1/18
 description NL-RTD01-ESX02-INT1
 switchport trunk encapsulation dot1q
 switchport trunk native vlan 11
 switchport mode trunk
!
interface GigabitEthernet1/34
 description NL-RTD01-ESX02-INT2
 switchport trunk encapsulation dot1q
 switchport trunk native vlan 11
 switchport mode trunk
!
vCenter Server Appliance
To have a full working vSphere lab I needed a vCenter Server so I installed the vCenter Server Appliance with these instructions
These instructions are initially written to get the vCenter Server Appliance installed on the Ravello System, but I applied it on my own nested lan environment.
In installed the vCenter Server Appliance twice just to have a spare one if something goes wrong with the first one.
| Hostname | Management IP | web administration page | vSphere Web Client |
|---|---|---|---|
| LAB-VCSA-01 | 10.11.11.50 | link | link |
| LAB-VCSA-02 | 10.11.11.60 | link | link |
Nested ESX Server
I want to create a lot of ESX servers and the fastest way to do this is install the ESX server once and clone this instance into multiple instances.
So installed one (template) ESX Server on top of another (physical) ESX Server with these instructions and also used this VM to clone the ESX to multiple instances.
With cloning you can run into all different issues when you add the cloned ESX instances to the vCenter Server and the link is pointing out what extra measures should be taken in order to clone without and problems.
I installed the ESX Server with the following settings:

I used four network interface cards (NIC) and I have three disks installed to install / test out the VSAN feature.
The "console" screen on the vSphere Web Client was not working because of a bug which I resolved with this article.
When we use the vSphere Web Client and we need to issue "F" keys (F11 for installation) this can be done with FN-CMD-Fxx (FN-CMD-F11) described here.
I installed VMware Tools for ESXi (when its running unto a nested configuration) using these instructions
~ # esxcli software vib install -v http://download3.vmware.com/software/vmw-tools/esxi_tools_for_guests/esx-tools-for-esxi-9.7.0-0.0.00000.i386.vib -f
Installation Result
   Message: The update completed successfully, but the system needs to be rebooted for the changes to be effective.
   Reboot Required: true
   VIBs Installed: VMware_bootbank_esx-tools-for-esxi_9.7.0-0.0.00000
   VIBs Removed:
   VIBs Skipped:
Then I rebooted the server to make sure all settings are applied and seen by the vCenter Server.
~ # reboot
I cloned the ESX template 10 times, and loaded them all into the vCenter Server Appliance (LAB-VCSA-01) and spread then across different (Virtual) Data Centers.
| Hostname | Management IP | Datacenter |
|---|---|---|
| LAB-ESX-01 | 10.11.11.62 | A |
| LAB-ESX-02 | 10.11.11.63 | A |
| LAB-ESX-03 | 10.11.11.64 | B |
| LAB-ESX-04 | 10.11.11.65 | B |
| LAB-ESX-05 | 10.11.11.66 | C |
| LAB-ESX-06 | 10.11.11.67 | C |
| LAB-ESX-07 | 10.11.11.68 | C |
| LAB-ESX-08 | 10.11.11.69 | D |
| LAB-ESX-09 | 10.11.11.70 | D |
| LAB-ESX-10 | 10.11.11.71 | D |

Running 64–bit virtual machines on top of the nested ESX hosts
Before we can run virtual (host) machines on the (nested) ESX hosts we need to make sure the Virtual Machine "version" is at least version 10.
Also make sure that the option “ Expose the NX/XD flag to guest is selected and enable the checkbox “Expose hardware assisted virtualization to the guest OS” on Hardware virtualization option.
More information about this can be found here.
VSAN configuration
In order to enable the VSAN feature you roughly need:
- three ESX servers
- at least one SSD disk per ESX server
- at least one "normal" disk per ESX server
- VMkernel adapter with VSAN feature enabled per ESX server
- Cluster with three ESX server members with VSAN feature enables on the cluster
Convert normal disk to SSD disk
Because I use a nested vSphere lab I used these instructions to trick the (nested) ESX server to believe it has one SSD disk.
~ # esxcli storage core device list
~ # esxcli storage nmp satp rule add -s VMW_SATP_LOCAL -d mpx.vmhba1:C0:T1:L0 -o enable_ssd
~ # esxcli storage core claiming reclaim -d mpx.vmhba1:C0:T1:L0
~ # vim-cmd hostsvc/storage/refresh
Network settings and VMkernel adapter
I used these instructions to configure VSAN.
In order to make VSAN work we need a new vmKernel (vmk1) adapter per ESX host in a preferably shared network.
In needed to make sure that these adapters are on the SAME network in order to exchange the information (under water) needed to enable the VSAN feature.
I created a separate VLAN on my core switch and access switch and a separate DHCP scope on my core switch in order to make sure the vmKernel adapter would receive a unique IP address.
On the ESX server I created a separate vSwitch (vSwitch1) and bound a new physical interface and the separate vmk1 adapter to that.

NL-RTD01-CS01
!
vlan 22
 name VSPHERE-LAB-10.22.22.0/24
!
vlan 666
 name NO-NETWORK
!
ip dhcp pool VSPHERE-LAB
   import all
   network 10.22.22.0 255.255.255.0
   default-router 10.22.22.253
   dns-server 8.8.8.8 8.8.4.4 208.67.222.222 208.67.220.220
!
interface Vlan22
 ip address 10.22.22.253 255.255.255.0
 no shut
!
NL-RTD01-AS02
!
vlan 22
 name VSPHERE-LAB-10.22.22.0/24
!
vlan 666
 name NO-NETWORK
!
VLAN 666 is a non-routable quarantine VLAN where I put in unused network adapters.
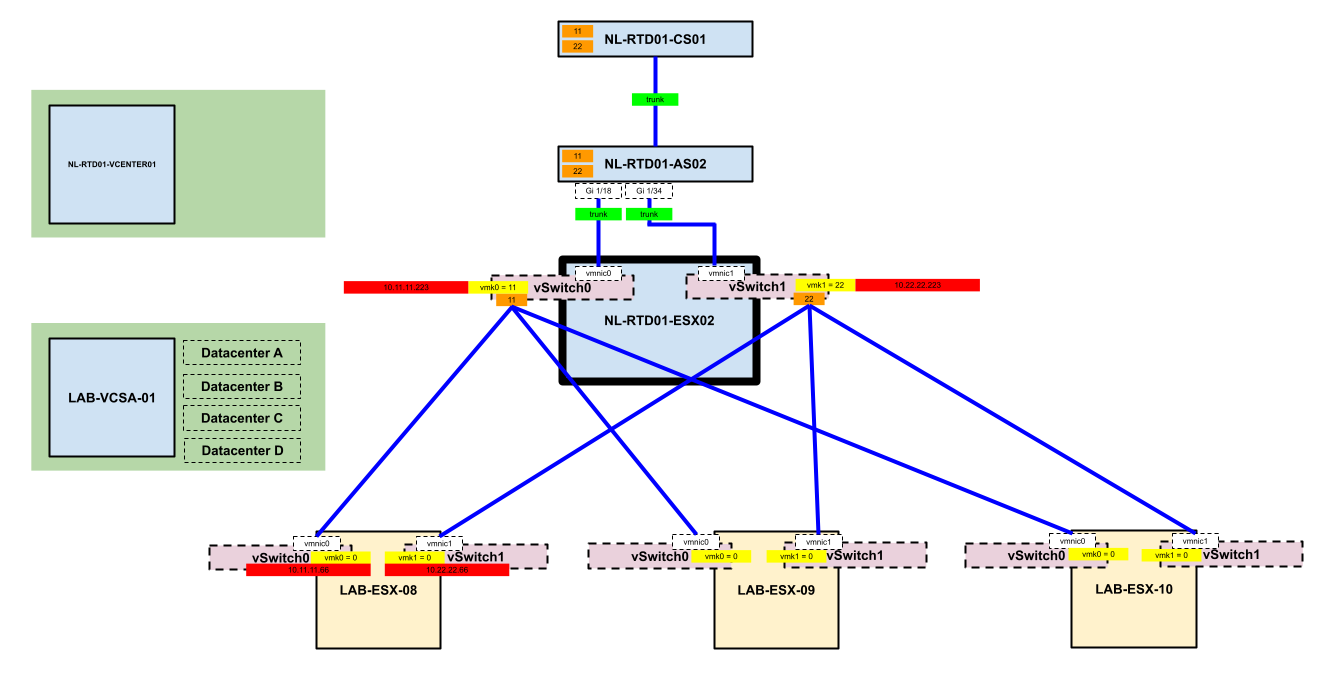
Because the nested vSphere lab environment with networking is pretty complex I created a Google Drawing to make things more clear on how to stretch the correct VLANS towards the nested ESX servers.
Disks
During the VSAN configuration I wanted to create the "disk group" to really combine all three disks of the ESX hosts together and really leverage the VSAN feature.
I got the error message that the disks where "ineligible".
I remembered that I already created Datastores and formatted the disks with the VMFS5 File System.
Apparently for VSAN to work the disks need to be completely empty whiteout and formatted partitions.
Verification if and partitions exists
~ # esxcli storage vmfs extent list
Volume Name     VMFS UUID                            Extent Number  Device Name          Partition
----  -----------------------------------  -------------  -------------------  ---------
4GB-LAB-ESX-08  55a2b666-3f09c2bd-8173-005056893b0e              0  mpx.vmhba1:C0:T1:L0          1
6GB-LAB-ESX-08  55a2b6a6-14f201f6-bec1-005056893b0e              0  mpx.vmhba1:C0:T2:L0          1
~ # ls -l /dev/disks/
total 23988095
-rw-------    1 root     root     2147483648 Jul 13 16:32 mpx.vmhba1:C0:T0:L0
-rw-------    1 root     root       4161536 Jul 13 16:32 mpx.vmhba1:C0:T0:L0:1
-rw-------    1 root     root     262127616 Jul 13 16:32 mpx.vmhba1:C0:T0:L0:5
-rw-------    1 root     root     262127616 Jul 13 16:32 mpx.vmhba1:C0:T0:L0:6
-rw-------    1 root     root     115326976 Jul 13 16:32 mpx.vmhba1:C0:T0:L0:7
-rw-------    1 root     root     299876352 Jul 13 16:32 mpx.vmhba1:C0:T0:L0:8
-rw-------    1 root     root     4294967296 Jul 13 16:32 mpx.vmhba1:C0:T1:L0
-rw-------    1 root     root     4293901824 Jul 13 16:32 mpx.vmhba1:C0:T1:L0:1
-rw-------    1 root     root     6442450944 Jul 13 16:32 mpx.vmhba1:C0:T2:L0
-rw-------    1 root     root     6441385472 Jul 13 16:32 mpx.vmhba1:C0:T2:L0:1
lrwxrwxrwx    1 root     root            19 Jul 13 16:32 vml.0000000000766d686261313a303a30 -> mpx.vmhba1:C0:T0:L0
lrwxrwxrwx    1 root     root            21 Jul 13 16:32 vml.0000000000766d686261313a303a30:1 -> mpx.vmhba1:C0:T0:L0:1
lrwxrwxrwx    1 root     root            21 Jul 13 16:32 vml.0000000000766d686261313a303a30:5 -> mpx.vmhba1:C0:T0:L0:5
lrwxrwxrwx    1 root     root            21 Jul 13 16:32 vml.0000000000766d686261313a303a30:6 -> mpx.vmhba1:C0:T0:L0:6
lrwxrwxrwx    1 root     root            21 Jul 13 16:32 vml.0000000000766d686261313a303a30:7 -> mpx.vmhba1:C0:T0:L0:7
lrwxrwxrwx    1 root     root            21 Jul 13 16:32 vml.0000000000766d686261313a303a30:8 -> mpx.vmhba1:C0:T0:L0:8
lrwxrwxrwx    1 root     root            19 Jul 13 16:32 vml.0000000000766d686261313a313a30 -> mpx.vmhba1:C0:T1:L0
lrwxrwxrwx    1 root     root            21 Jul 13 16:32 vml.0000000000766d686261313a313a30:1 -> mpx.vmhba1:C0:T1:L0:1
lrwxrwxrwx    1 root     root            19 Jul 13 16:32 vml.0000000000766d686261313a323a30 -> mpx.vmhba1:C0:T2:L0
lrwxrwxrwx    1 root     root            21 Jul 13 16:32 vml.0000000000766d686261313a323a30:1 -> mpx.vmhba1:C0:T2:L0:1
~ #
From previous research I know that (for all three ESX hosts):
- mpx.vmhba1:C0:T1:L0 = the 4GB disk that I converted to SSD
- mpx.vmhba1:C0:T2:L0 = the 6GB disk that I is going to be used as VSAN storage
The ":1" behind it indicates that the disk has another partition which I needed to delete.
I used these instructions to delete the partitions.
~ # partedUtil delete /dev/disks/mpx.vmhba1:C0:T1:L0 1
~ # partedUtil delete /dev/disks/mpx.vmhba1:C0:T2:L0 1
And after that I did a "rescan storage" for each ESX host.
Eventually I got my disks added and the end-result was that I could configure the disks with these instructions.
